Wiring harness (part 4) & coax
TLDR
- Installed headphone jacks on the passenger seats
- Cleaned up harness through center channel
- Installed GAD 29C
- Practiced crimping bnc connectors
Details
Headphone jacks
I secured the wire for headphone jack on the rib between rear fuselage and luggage compartment. Then I bolted down the headphone jacks on their corresponding location.

The wire on the right passenger side was slight long. I didn’t want to solder any wires, so I just left the extra long wires as service loop. I did put on a bunch of anti-chafing tapes to provide some protection.

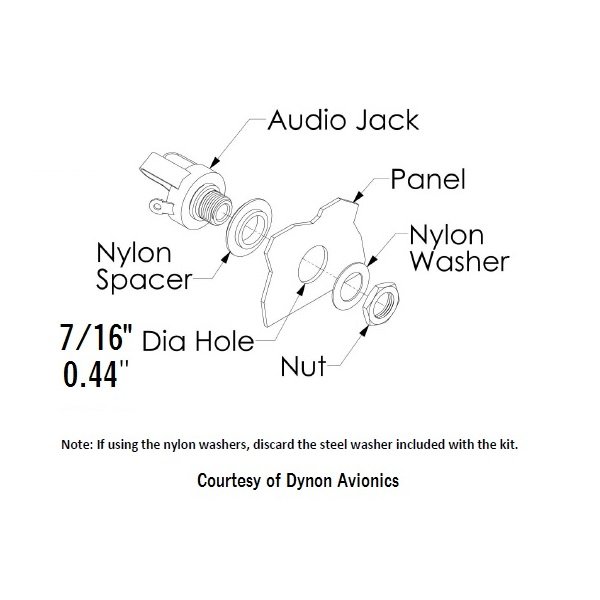
The headphone jack came with 2 fiber washers. They needed to go in specific order to fully protect the headphone jacks from ground loop. ie, the jack circuit should not be grounded to the airframe.

Stein air’s website has a diagram that shows the washer installation.
After installation, I tested continuity between the headphone jack and the airframe and made sure there was none.
Harness
Previously I had problem figuring out where to install GAD 29C. I sent the question to MWPB and they sent me a mount that goes on top of the GNX375 unit. Today I received the mount and finished the installation.


Wires
I continued to clean up the wires running through the center channel. Now I have a huge bundle of harness, 3 pneumatic lines, 5 coax cables. I expect to add 2 fuel hoses and a brake line in a few weeks. So the space is getting very crowded.
At this moment, since I don’t have everything in place just yet, I have to make some guesses on how much wire I should save on each end, specifically coax wires since they need to cut and crimped on one end.
Anyways, I cable tied a bunch of wires and hoses together and added some anti-chafe taps/edge protectors etc along the route. I tried to move the control sticks around throughout the process to ensure the bolts do not catch any wires.


BNC Connectors
I cut a segment of the extra coax cable and bought a few extra BNC connectors as practice. I followed an youtube video published by Stein Air and end up with a reasonably decent looking cable.

I tested continuity between the connector shell and core on both ends, and there is none. I think that’s what’s expected. But when I work on the real cable on the airplane it will be super long, and I won’t be able to use my multimeter to test continuity. So I ordered a cheap bnc testing on Amazon. I’m excited and nervous at the same time for this part of the build.